SCNG Technical Blog
SCNG Technical Blog
Windows Server 2022, WordPress

Installing WordPress on Windows: Part1

Installing WordPress on Windows: Part2

Installing WordPress on Windows: Part3

Installing WordPress on Windows: Part4


I think that is necessary to write, how to install WordPress on Windows, using IIS. In fact, that is not so easy task to do it in the right way. We have to take care of security, performance and stability.


If we want to install WordPress on Windows, we need MySQL Community Server, PHP for Windows and IIS installation and configuration. WordPress can be installed on Windows 10/11 or any version of Windows Server. In our case, we will install WordPress on Windows Server 2022.


In the first part we will cover MySQL Community Server installation and configuration.


On a fresh Windows Server 2022 installation, we download the latest MySQL Installer MSI (8.0.27) from Official Oracle Web page (mysql-installer-community-8.0.27.1.msi).

Now, we need to run MySQL Installer MSI.


On the Choosing a Setup Type screen, we select the Custom option.
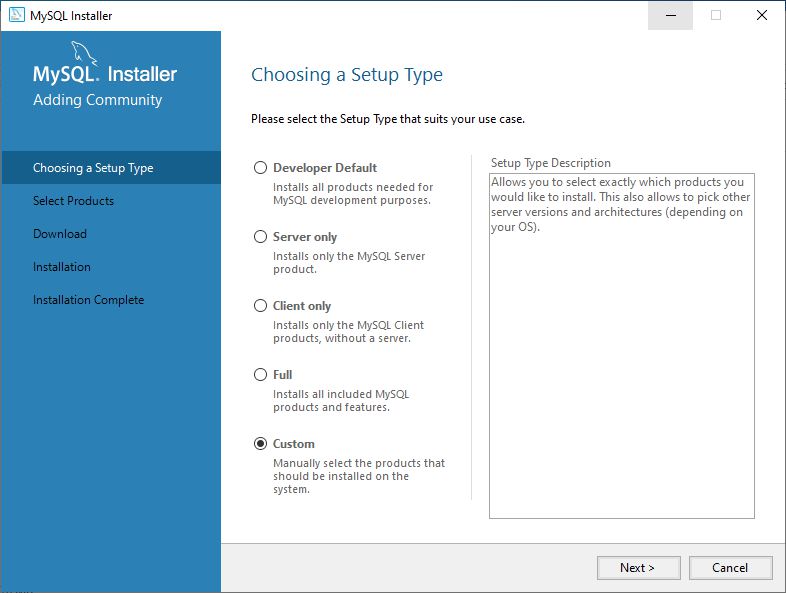
 

MySQL WordPress 1


On the Select Products screen, we select  MySQL Server 8.0.27 – X64, MySQL Workbench 8.0.27 – X64 and MySQL Documentation 8.0.27 – X86.
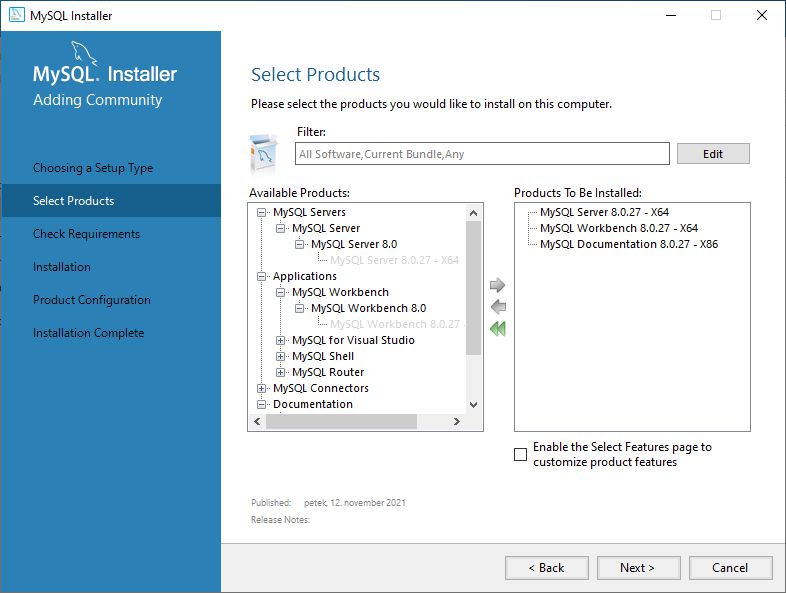
 

MySQL WordPress 2


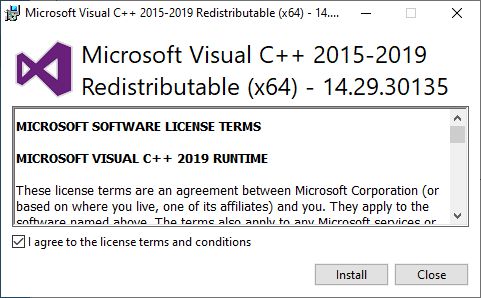
On the Check Requirements screen, we have to install Microsoft Visual C++ 2015-2019 Redistributable (x64). We can do it by selecting Execute button below.
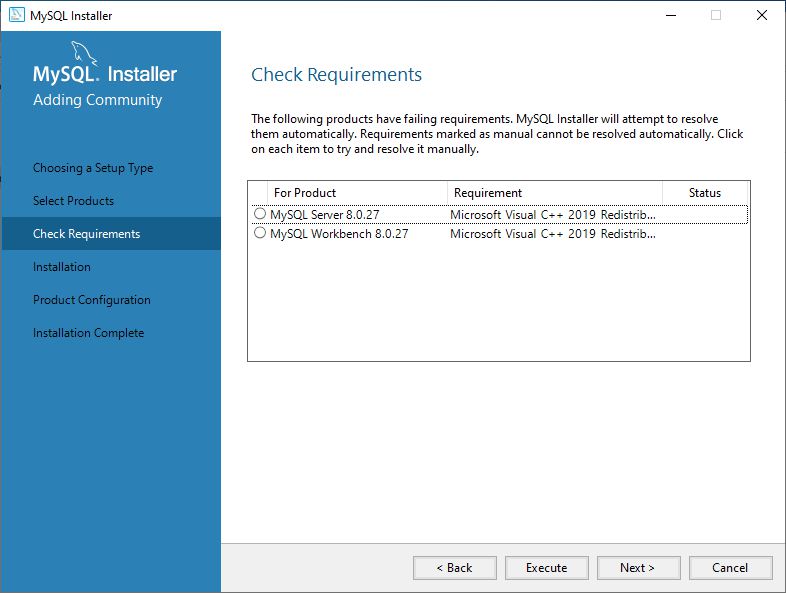
 

MySQL WordPress 3


We have to agree to the license terms and conditions.
 

MySQL WordPress 4


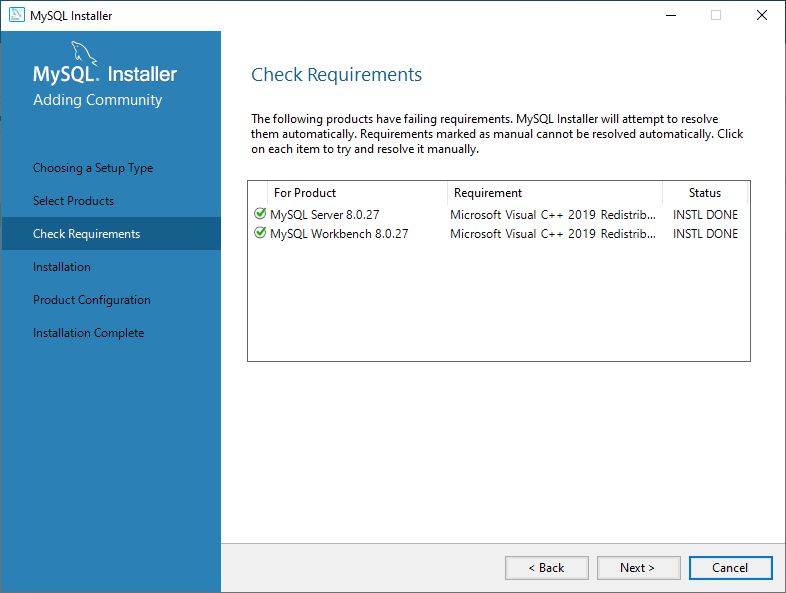
After, that we can see the confirmation, that requirements are fulfilled.
 

MySQL WordPress 5


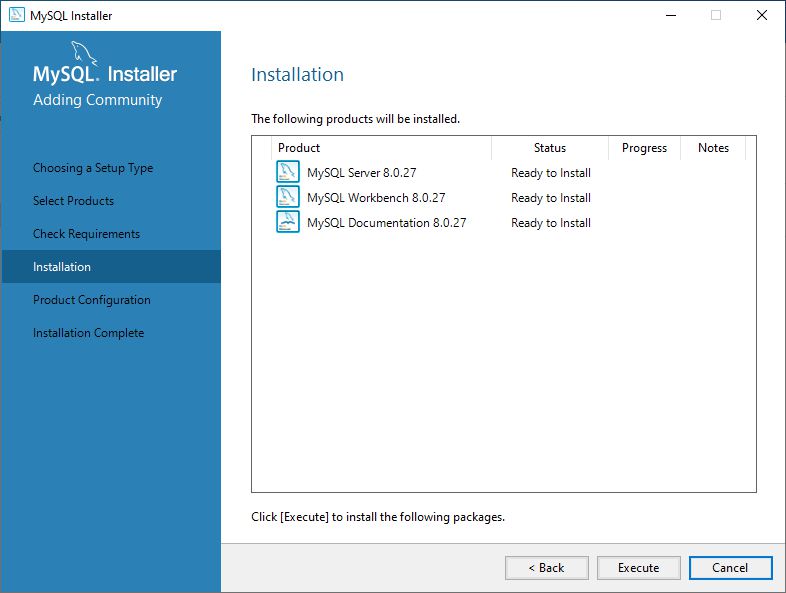
On the Installation screen, we are ready to install selected products by selecting the Execute button below.
 

MySQL-WordPress 6


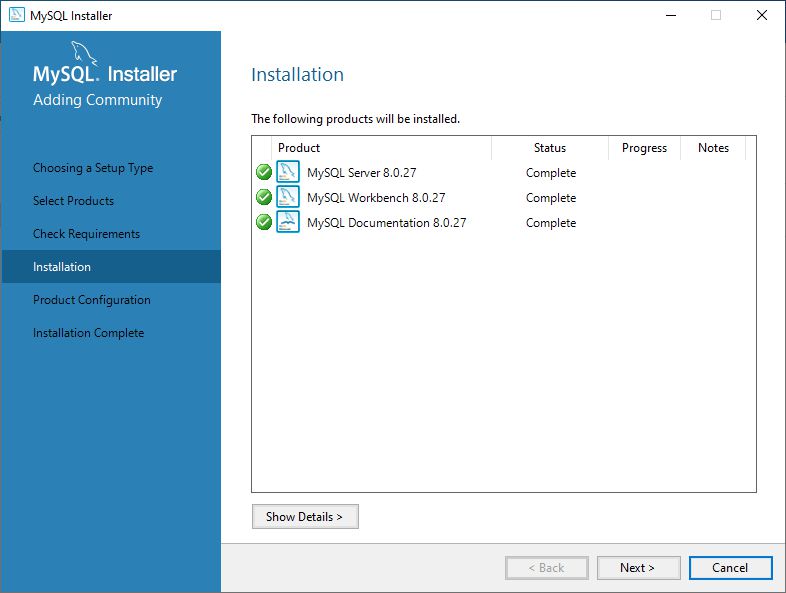
We can see that Products are installed successfully.
 

MySQL WordPress 7


On the Product Configuration screen, we are ready to configure MySQL Server.
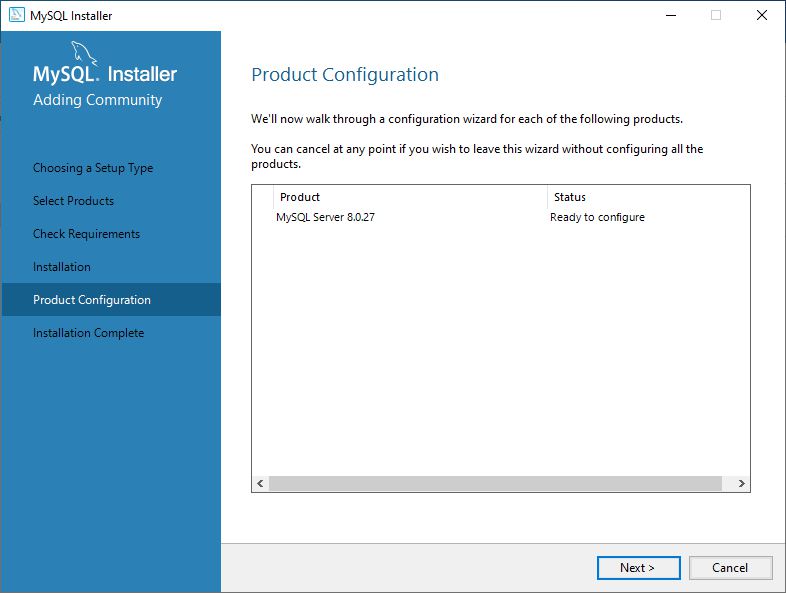
 

MySQL WordPress 8


On the Type and Networking screen, we choose the appropriate Config Type option. For the production use, we choose Server Computer.
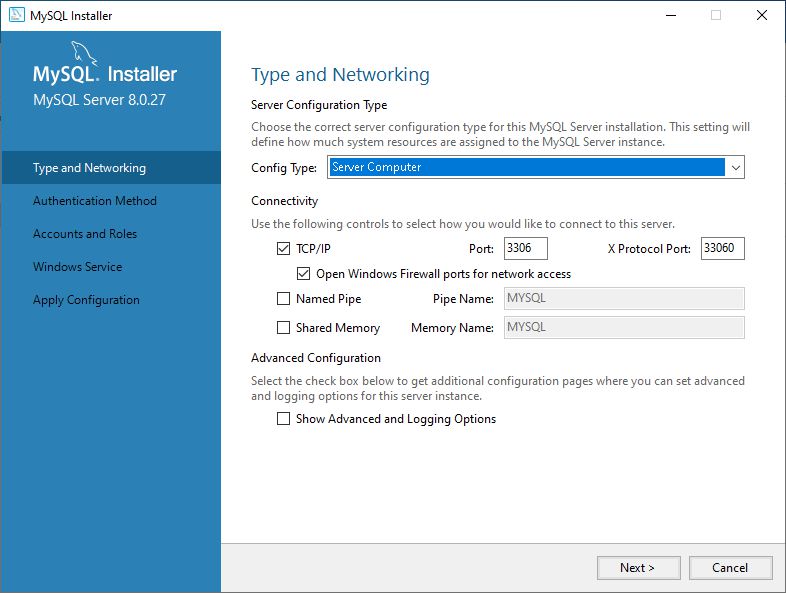
 

MySQL WordPress 9


On the Authentication Method screen, we choose the recommended Use Strong Password Encryption for Authentication option.
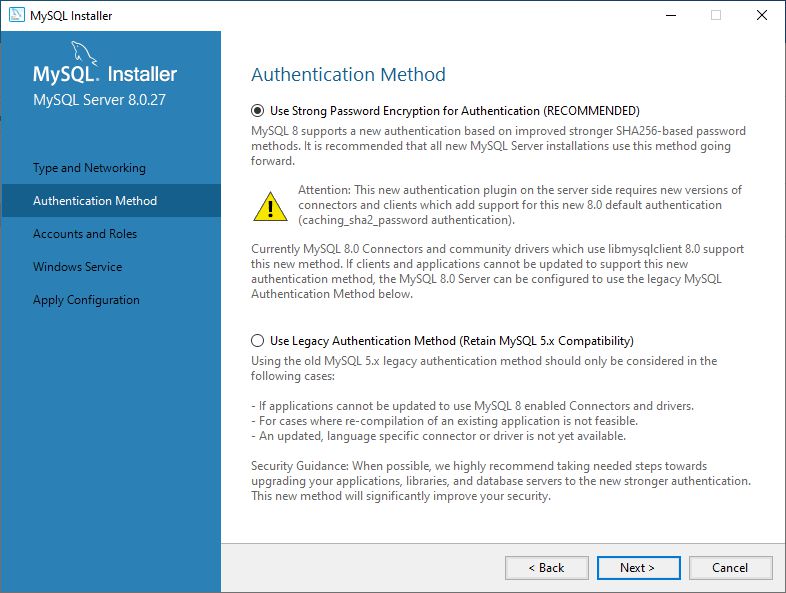
 

MySQL WordPress 10


On the Accounts and Roles screen, we enter the strong MySQL Root Password.
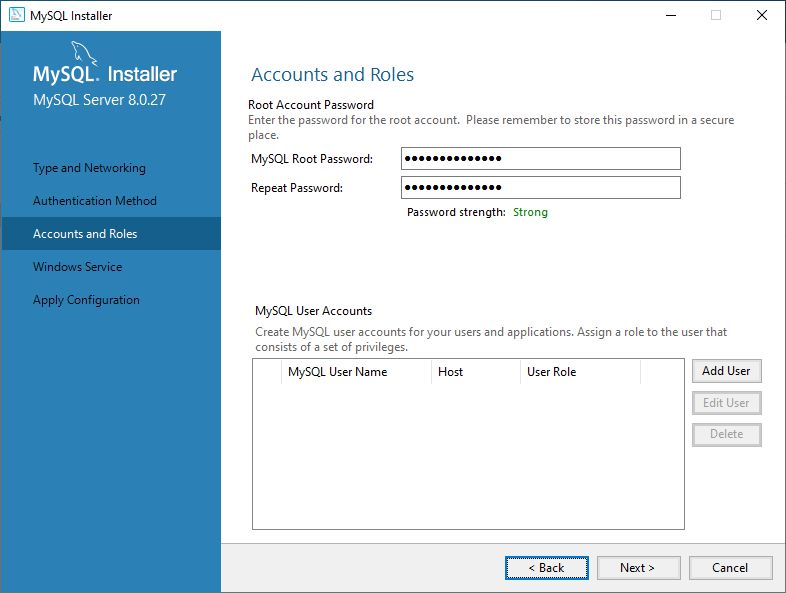
 

MySQL WordPress 11


On the Windows Service screen, we can use the default options. If we want, we can edit the Windows Service Name.
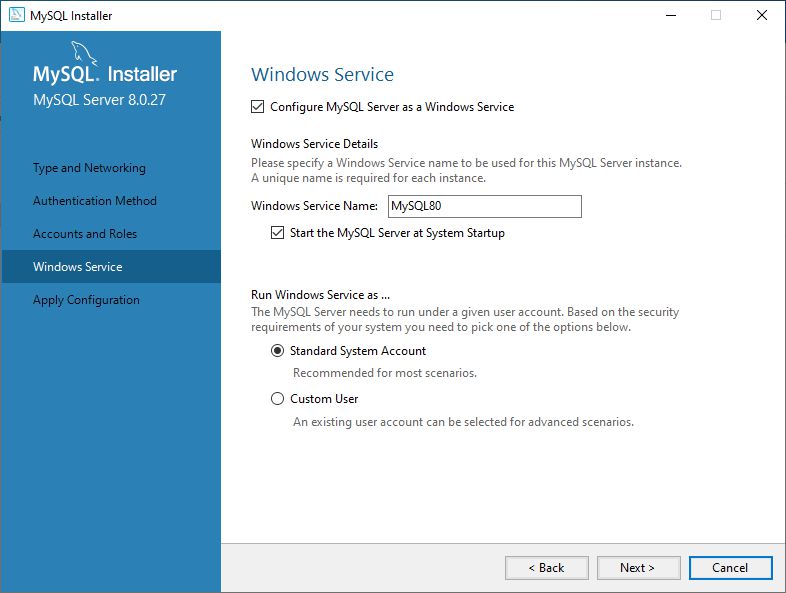
 

MySQL WordPress 12


On the Apply Configuration screen, we are ready to apply the selected configuration settings by selecting the Execute button below.
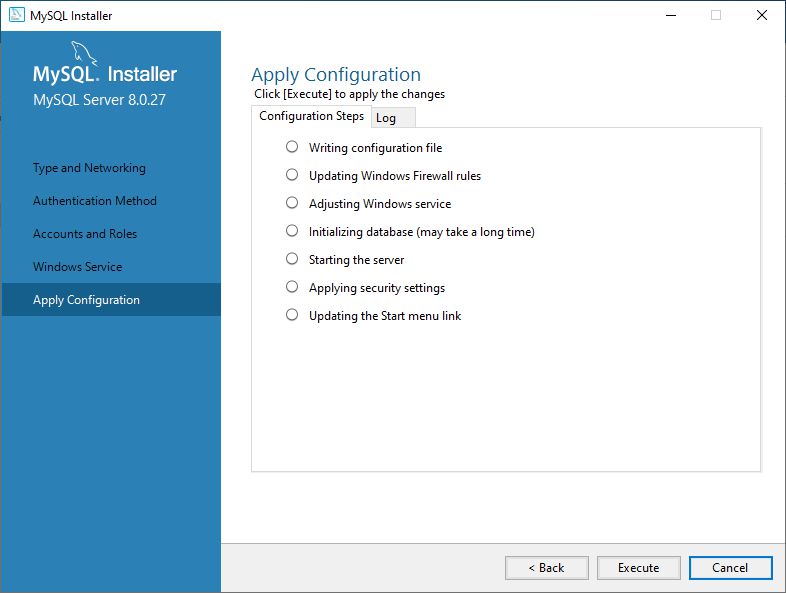
 

MySQL WordPress 13


We can see that everything is configured successfully.
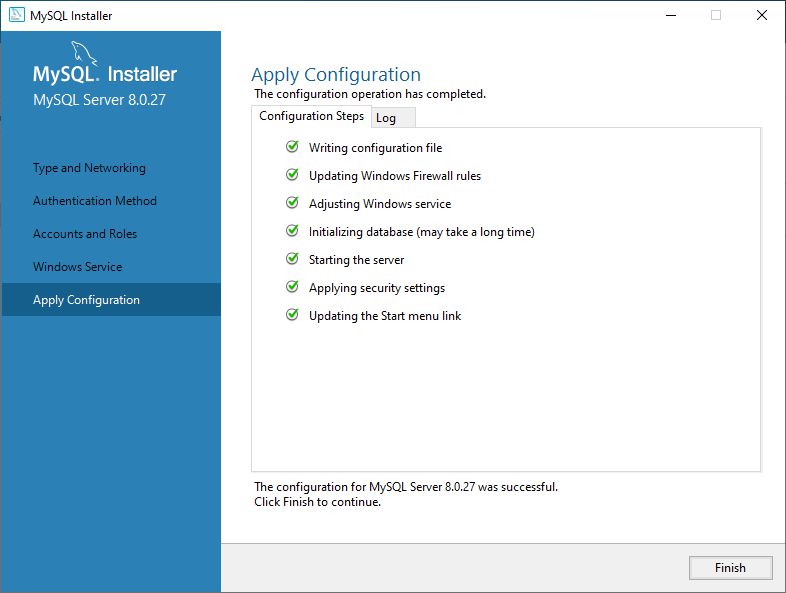
 

MySQL WordPress 14


On the Installation Complete screen we see, that the MySQL installation and configuration has been completed.
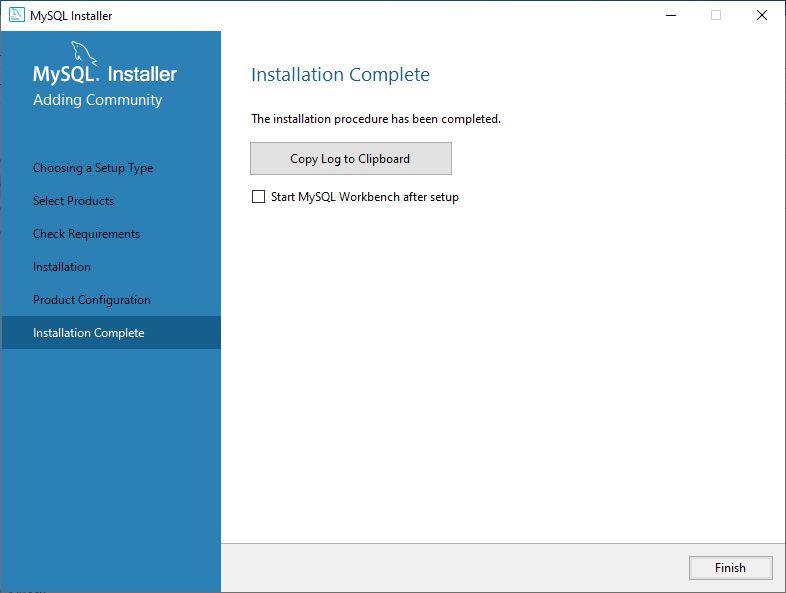
 

MySQL WordPress 15


We need an empty database which is needed for WordPress.

We can create it by using MySQL Workbench, but we can do it easier by using the installed MySQL 8.0 Command Line Client. After we start it, we have to enter our MySQL Root password.
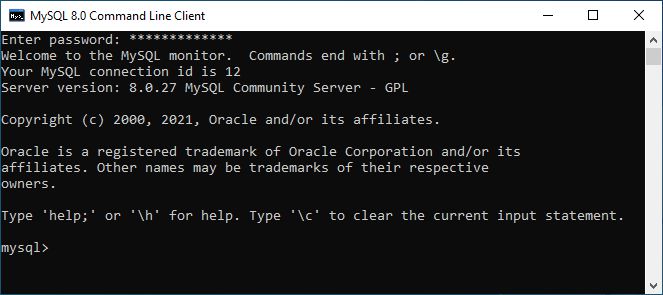
 

MySQL WordPress 16


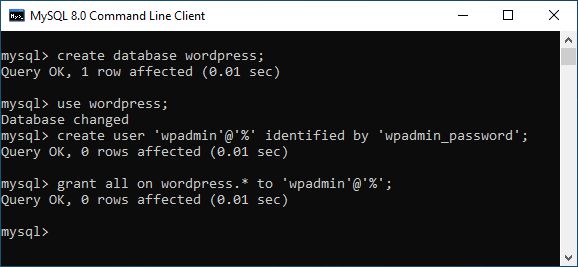
Firstly, we have to create an empty database, named wordpress:

create database wordpress;

Then, we have to use the created database wordpress:

use wordpress;

We create the user, named wpadmin with wpadmin_password (the wpadmin password should be different, then the password for the root user).

create user ‘wpadmin’@’%’ identified by ‘wpadmin_password’;

wpadmin user must have all rights on the wordpress database:

grant all on wordpress.* to ‘wpadmin’@’%’;
 

MySQL WordPress 17


We have successfully created an empty database, named wordpress and the user wpadmin that will be used for the WordPress.


Next, we have to install and configure PHP.
 

27. January 2022by Simon Abolnar
Windows Server 2022

Event 10016
{03E09F3B-DCE4-44FE-A9CF-82D050827E1C} Warning

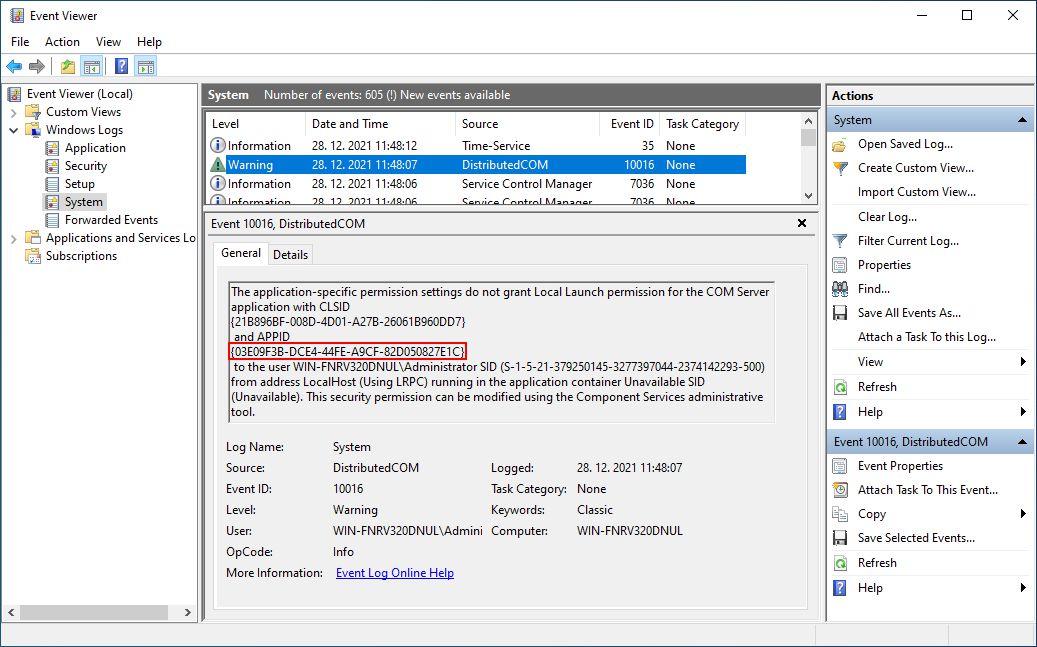
If we look the Windows Server 2022 Event System Log, we can see
Event 10016, APPID {03E09F3B-DCE4-44FE-A9CF-82D050827E1C} Warning:

The application-specific permission settings do not grant Local Launch permission for the COM Server application with CLSID
{21B896BF-008D-4D01-A27B-26061B960DD7}
and APPID
{03E09F3B-DCE4-44FE-A9CF-82D050827E1C}
to the user Win-Test\Administrator SID (S-1-5-21-379250145-3277397044-2374142293-500) from address LocalHost (Using LRPC) running in the application container Unavailable SID (Unavailable). This security permission can be modified using the Component Services administrative tool.


Distributedcom warning 10016


Microsoft recommendation is (DCOM event ID 10016 is logged in Windows):
“These events can be safely ignored because they don’t adversely affect functionality and are by design. It’s the recommend action for these events.”


However, these warnings are very annoying and can confuse anyone, that something is wrongly configured.


In this case, the current logged in user does not have permission to Local Launch (Local Activation) DCOM Application with APPID, {03E09F3B-DCE4-44FE-A9CF-82D050827E1C}.


Solution:


We have to enable Local Launch (Local Activation) permission for Users group for DCOM Application with APPID, {03E09F3B-DCE4-44FE-A9CF-82D050827E1C} in Component Services application.


We have to open Component Services application as Administrator, Computers, My Computer, DCOM Config and select Detail View from View Menu.

From the list we can find the Application with APPID, {03E09F3B-DCE4-44FE-A9CF-82D050827E1C}.


Component Services 03e09f3b


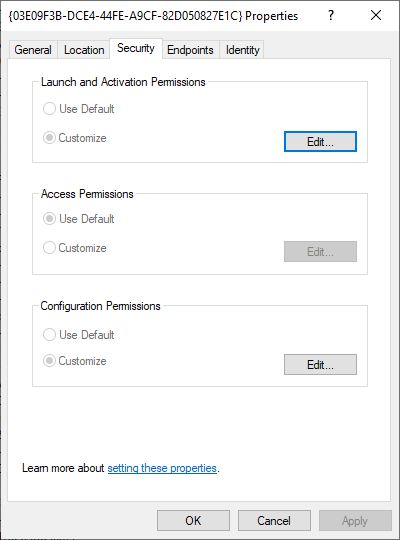
If we right click on {03E09F3B-DCE4-44FE-A9CF-82D050827E1C} application and select Security Tab, everything is gray, because as administrator we don’t have permission to change DCOM Application permissions.


03e09f3b properties


It is easy to change permissions for selected Application with Registry Editor (regedit.exe).

With Edit/Find command, we can find {03E09F3B-DCE4-44FE-A9CF-82D050827E1C} Application ID in Registry.

It is located in HKEY_CLASSES_ROOT\AppId\{03E09F3B-DCE4-44FE-A9CF-82D050827E1C}.


03e09f3b registry


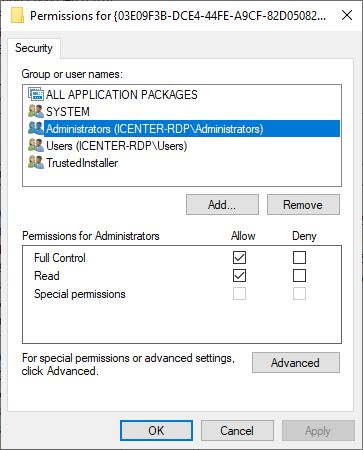
With right click and selected Permissions…, we can change permissions for selected AppId. First, we need to change the owner of registry Key.

Go to Advanced, change Owner to Administrators group (local Administrators group, if computer is a member of domain), select OK twice. Then open Permissions window once again and change permissions of Administrators group to Full Control.


03e09f3b permissions


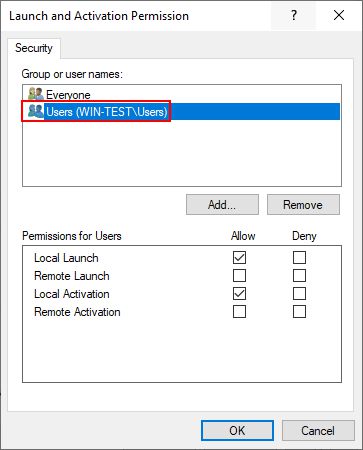
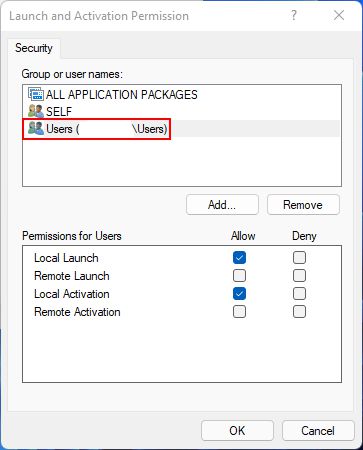
Now, we have to open Component Services application as Administrator again, Computers, My Computer, DCOM Config and select Detail View from View Menu. If we right click on {03E09F3B-DCE4-44FE-A9CF-82D050827E1C} application and select Security Tab, we can edit Launch and Activation Permissions. When we click on Edit Button, we open the Launch and Activation Permission Window.


We have to Add Users group (local Users group, if computer is a member of domain). We have to set Local Launch and Local Activation Permissions for Users group.


03e09f3b launch permission


That’s it. We will not see Event 10016, APPID {03E09F3B-DCE4-44FE-A9CF-82D050827E1C} Warning any more in Windows Server 2022.


Enjoy!!!


29. December 2021by Simon Abolnar
Windows 11, Windows Server 2022

Event 10016 PerAppRuntimeBroker Warning

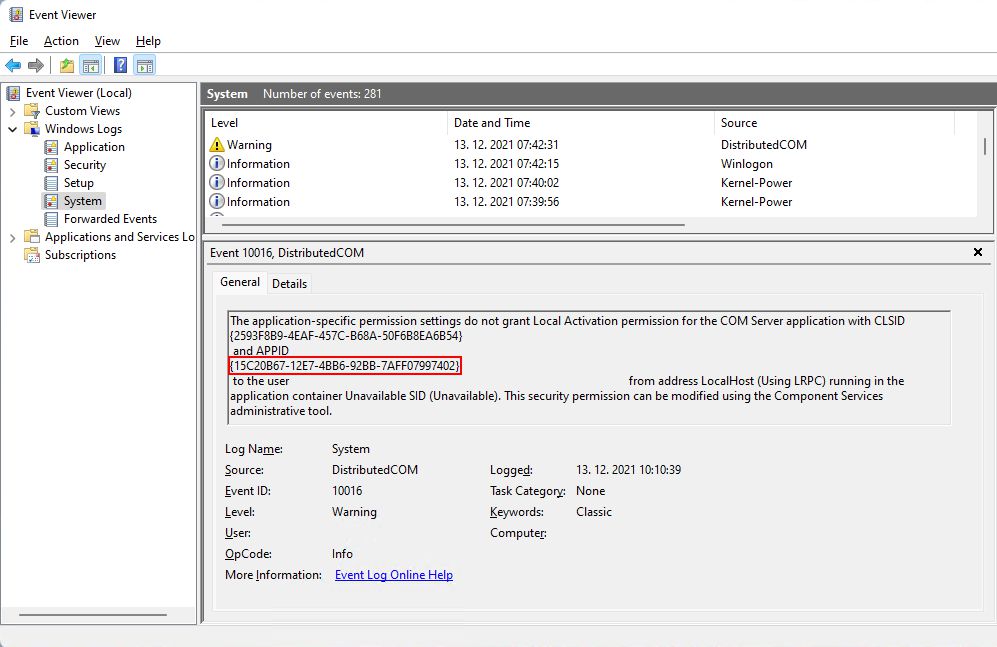
If we look at Windows 11 or Windows Server 2022 Event System Log, we can see Event 10016 PerAppRuntimeBroker (APPID: {15C20B67-12E7-4BB6-92BB-7AFF07997402}) Warning:

The application-specific permission settings do not grant Local Activation permission for the COM Server application with CLSID
{2593F8B9-4EAF-457C-B68A-50F6B8EA6B54}
and APPID
{15C20B67-12E7-4BB6-92BB-7AFF07997402}
to the user Username (…) from address LocalHost (Using LRPC) running in the application container Unavailable SID (Unavailable). This security permission can be modified using the Component Services administrative tool.


Event 10016 PerAppRuntimeBroker Warning


Microsoft recommendation is (DCOM event ID 10016 is logged in Windows):
“These events can be safely ignored because they don’t adversely affect functionality and are by design. It’s the recommend action for these events.”


However, these warnings are very annoying and can confuse anyone, that something is wrongly configured.


With further analysis, we can find out, that DCOM application with ID {15C20B67-12E7-4BB6-92BB-7AFF07997402} is PerAppRuntimeBroker.

In this case, the current logged in user does not have permission to Local Launch (Local Activation) DCOM Application PerAppRuntimeBroker.


Solution:


It doesn’t help if we enable Local Launch (Local Activation) permission for logged in user for DCOM Application PerAppRuntimeBroker in Component Services application. We have to enable LocalLaunch (Local Activation) permission for local Users group!


We have to open Component Services application as Administrator, Computers, My Computer, DCOM Config and select Detail View from View Menu.

From the list we can find  Application PerAppRuntimeBroker with ID {15C20B67-12E7-4BB6-92BB-7AFF07997402}.


Component Services PerAppRuntimeBroker


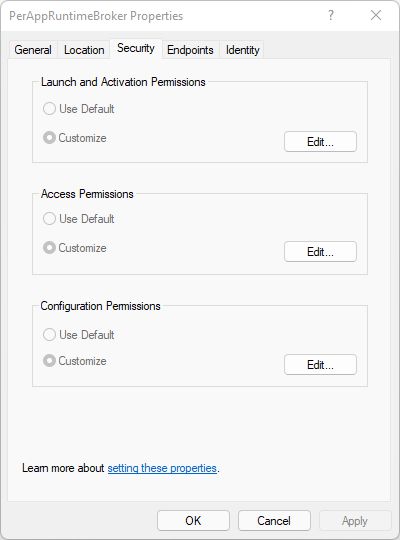
If we right click on PerAppRuntimeBroker application and select Security Tab, everything is gray, because as administrator we don’t have permission to change DCOM Application permissions.


PerAppRuntimeBroker Properties


It is easy to change permissions for selected Application with Registry Editor (regedit.exe).

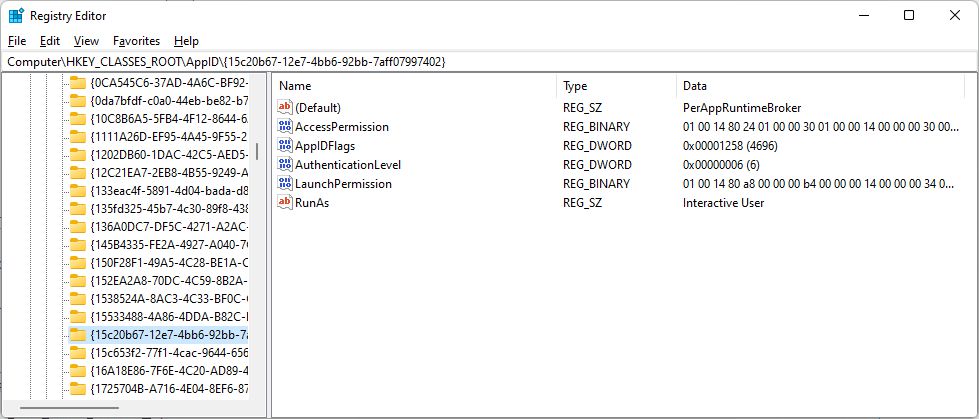
With Edit/Find command, we can find PerAppRuntimeBroker Application ID in Registry.

It is located in HKEY_CLASSES_ROOT\AppId\{15C20B67-12E7-4BB6-92BB-7AFF07997402}.


Registry PerAppRuntimeBroker


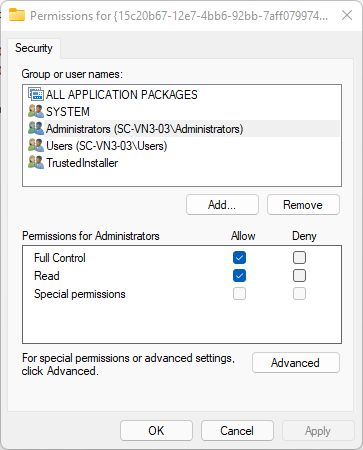
With right click and selected Permissions…, we can change permissions for selected AppId. First, we need to change the owner of registry Key.

Go to Advanced, Change Owner to Administrators group (local Administrators group, if computer is member of domain), select OK twice. Then open Permissions window once again and change permissions of Administrators group to Full Control.


PerAppRuntimeBroker permissions


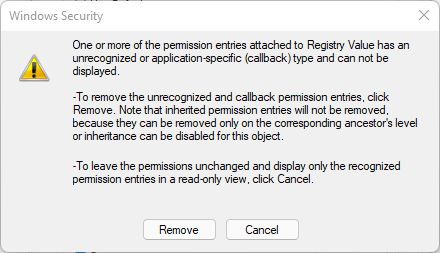
Now, we have to open Component Services application as Administrator again, Computers, My Computer, DCOM Config and select Detail View from View Menu. If we right click on PerAppRuntimeBroker application and select Security Tab, we can edit Launch and Activation Permissions. When we click on Edit Button, we get a Windows Security window:


PerAppRuntimeBroker windows security


Obviously, something is wrong with permissions. So, we can choose a Remove button.

We have to Add Users group (local Users group, if computer is a member of domain). We have to set Local Launch and Local Activation Permissions for Users group.


Launch and Activation permission PerAppRuntimeBroker


That’s it. We will not see Event 10016 PerAppRuntimeBroker Warning any more in our OS.


Enjoy!!!


I invite you to solve also Event 10016 Windows.SecurityCenter Warnings in Windows 11!


13. December 2021by Simon Abolnar
Page 2 of 3«123»

About us

We are employed at School Center Nova Gorica (SCNG), which is located in Slovenia-EU and we are enthusiastic about new technologies, especially in Microsoft Technologies. We would like to share our knowledge, thoughts and solutions in different areas of Information Technologies.

Authors:

  • Simon Abolnar
  • Klavdij Mervic
  • Barbara Pusnar

Categories

  • Exchange Server
  • Hyper-V
  • Office 2021
  • SCCM
  • SharePoint
  • Windows 11
  • Windows Server 2022
  • WordPress

Links

  • Solski center Nova Gorica
  • Luka Manojlovic - Blog

Recent Posts

  • Installing WordPress on Windows: Part4 27. January 2022
  • Installing WordPress on Windows: Part3 27. January 2022
  • Installing WordPress on Windows: Part2 27. January 2022

Recent Comments

  • Skye on Event 10016
    {03E09F3B-DCE4-44FE-A9CF-82D050827E1C} Warning
  • Simon Abolnar on Installing WordPress on Windows: Part4
  • Sandi on Installing WordPress on Windows: Part4

Archives

  • January 2022
  • December 2021
  • September 2016
  • August 2016

Tags

Exchange Server Hyper-V Office 2021 SCCM SharePoint Windows 11 Windows Server 2022 WordPress

“I started with Brixton to provide you with daily fresh new ideas about trends. It is a very clean and elegant Wordpress Theme suitable for every blogger. Perfect for sharing your lifestyle.”

© 2022 - Prowdly Powered by Wordpress