Installing WordPress on Windows: Part1
Installing WordPress on Windows: Part2
Installing WordPress on Windows: Part4
In the third part, we will install and configure IIS, that use PHP as FastCGI.
Firstly, we need to install IIS by using Server Manager. We choose Add roles and features, Next, Role-based or feature-based installation, Next, select our server from Server Pool, Next and select Web Server (IIS) role that we want to install. We also select [Tools] IIS Management Console feature installation (Add Features).
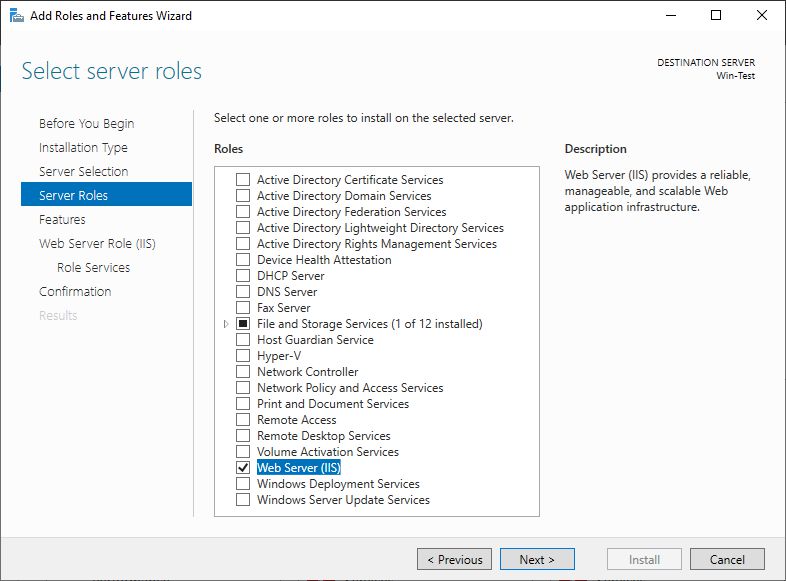
We continue with Next, Next, Next. Now we have to choose, which Role Services we would like to install. We have to add CGI under Application Development.
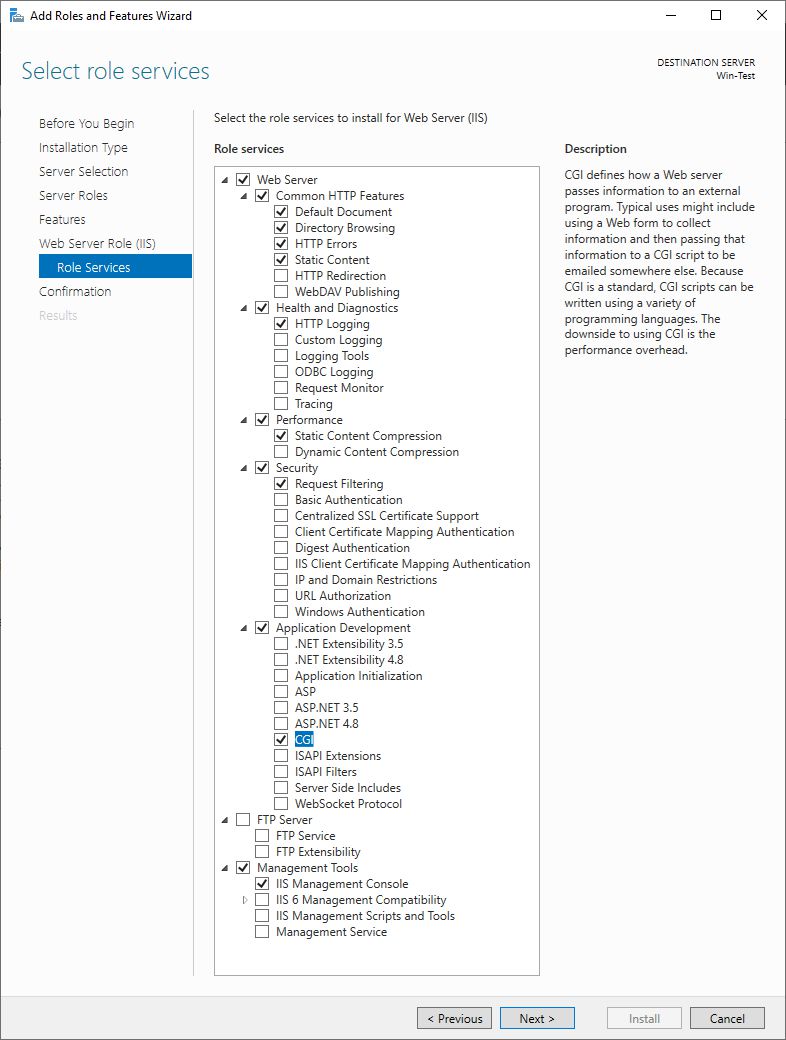
After that, we continue installation by selecting Next and Install.
We have to install also the URL Rewrite 2.1 extension, that we will use in our configuration. We have to download it from Official Microsoft site, www.iis.net. Installation is very easy. Unfortunately, the setup will also install the Web Platform Installer 5.1, that will install the required extension. We can uninstall it, after the install procedure is over.
Now, we are ready to configure the IIS.
For configuration we will use Internet Information Services (IIS) Manager. In the first step, we will create a new Website, that will be used by WordPress. We have to create a folder (C:\inetpub\wordpress), which will be used for WordPress files and folders location.
So we select Sites under Connections window and choose Add Website… We enter new Site Name (WordPress) with Application pool (WordPress) and define the Physical path, which was created before (C:\inetpub\wordpress).
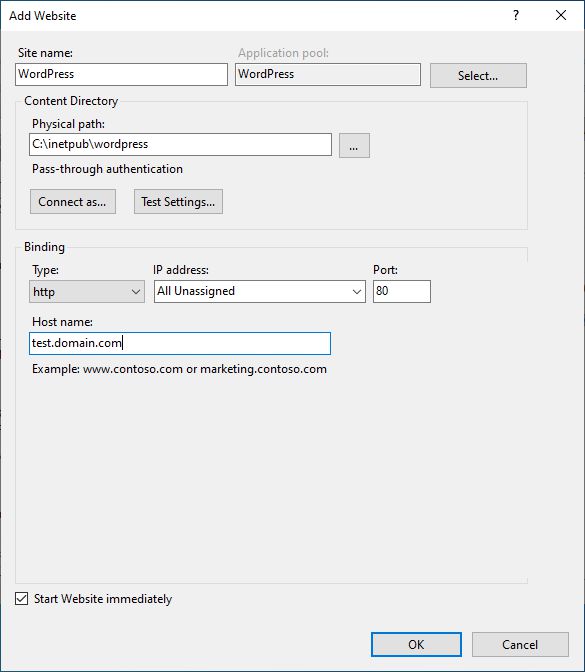
We have to select appropriate Binding. Port 80 is already used by Default Web Site, which was created during IIS installation. So, we have to enter the Host name, that will be used for accessing our WordPress site (test.domain.com). You write your own FQDN of your server name.
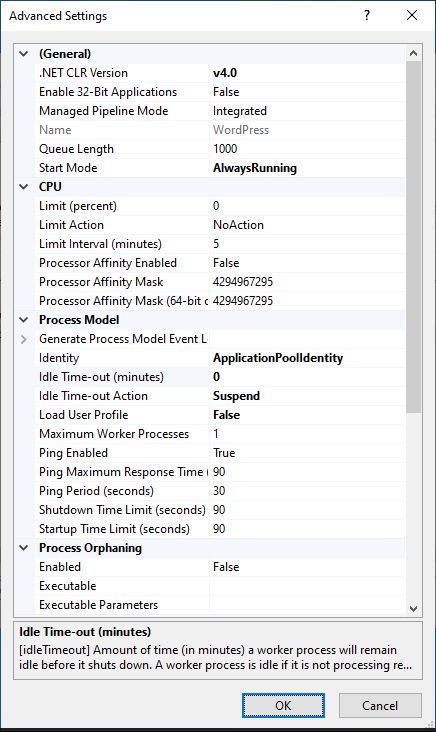
In IIS Manager, we select created Application Pool (WordPress) and change Advanced Settings:
Start Mode: Always Running
Idle Time-out (minutes): 0
Idle Time-out Action: Suspend
After that, we have to add permission on C:\PHP folder for the user IUSR with Read & Execute, List folder contents and Read permissions. This applies to this folder, subfolders and files.
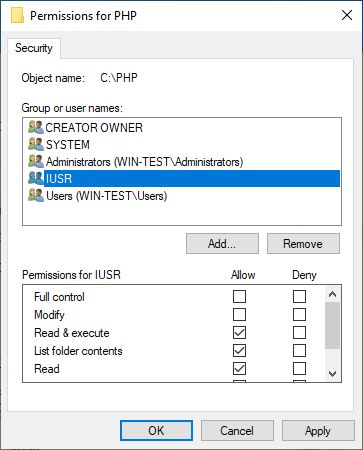
We have to add permission on C:\PHP-System folder for the user IUSR with Read & Execute, List folder contents and Read permissions. This applies to this folder, subfolders and files.
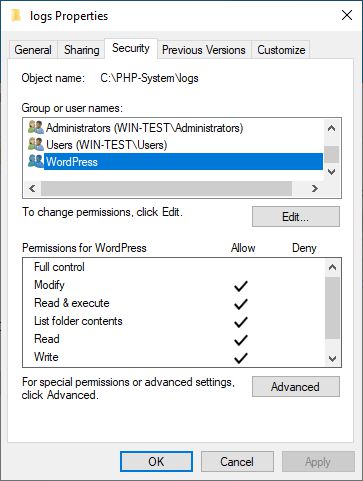
We have to add permission on C:\PHP-System\logs, C:\PHP-System\session.save_path, C:\PHP-System\sys_temp_dir and C:\PHP-System\upload_tmp_dir folders for the user IIS AppPool\WordPress with Modify, Read & Execute, List folder contents, Read and Write permissions. This applies to this folder, subfolders and files.
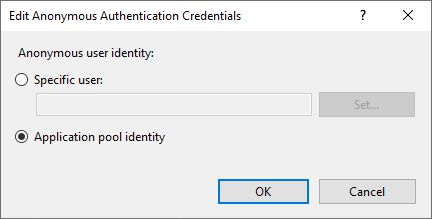
We have to change Anonymous Authentication Credentials to Application pool Identity by selecting WordPress Site in IIS Manager, and edit Anonymous Authentication.
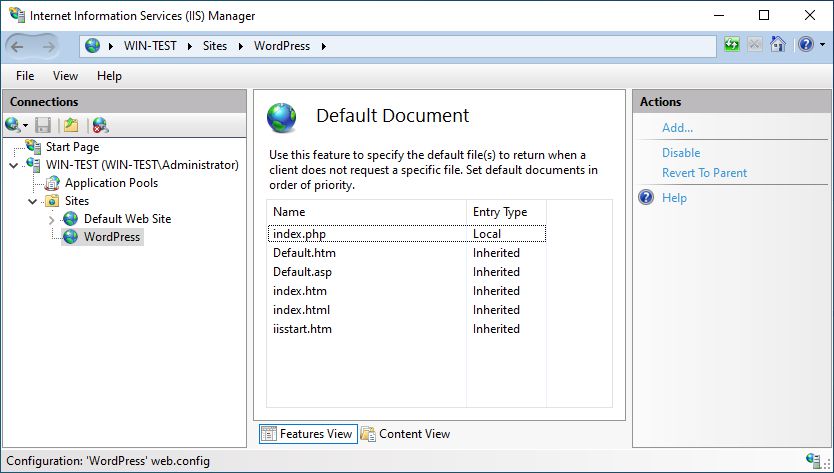
By selecting Default Document, we have to add index.php name.
In the next step, we have to select our computer name under Connections window.
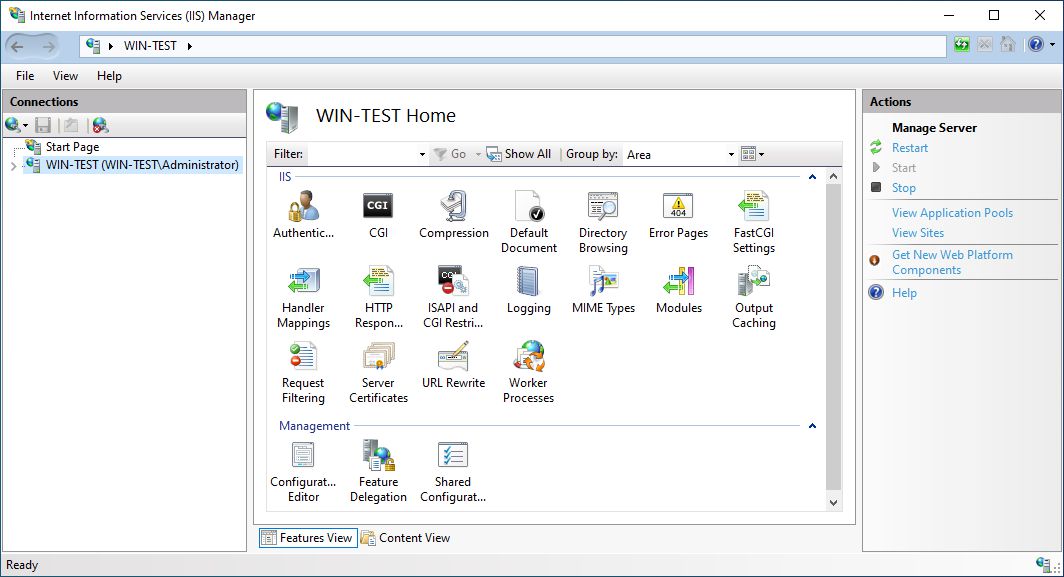
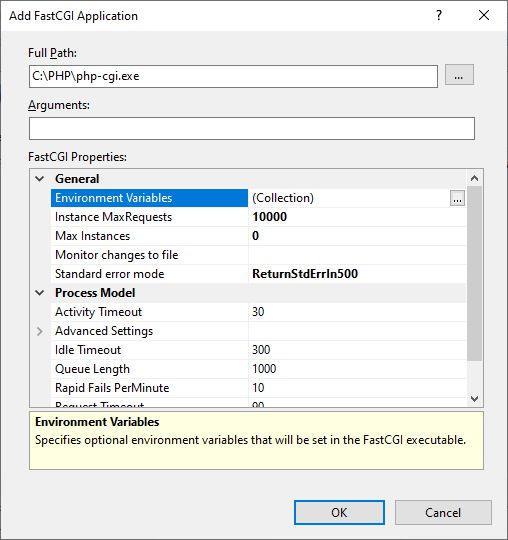
We need to select FastCGI Settings and Add Application… We need to select php.exe location (in our case C:\PHP\php-cgi.exe) and we change FastCGI Properties:
Instance MaxRequests: 10000
Max Instances: 0
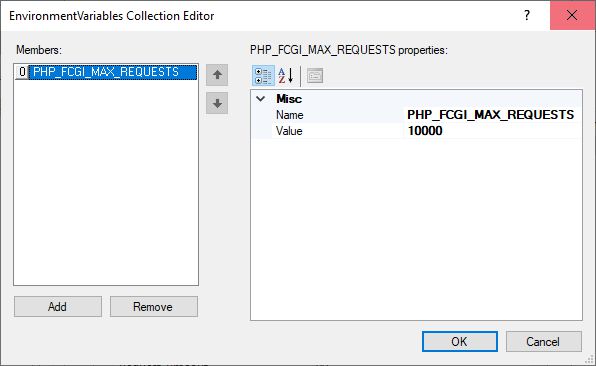
We click on the three dots next to Environment Variables (Collection). Then we add the variable with the name PHP_FCGI_MAX_REQUESTS and value 10000.
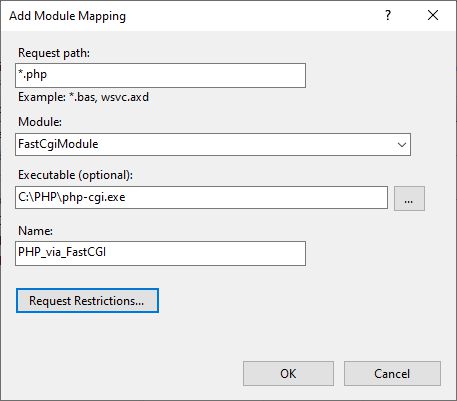
We return to the first IIS screen and select Handler Mappings. We select Add Module Mapping… and enter data:
Request path: *.php
Module: FastCGIModule
Executable (optional): C:\PHP\php-cgi.exe
Name: PHP_via_FastCGI
We have to confirm it by clicking Yes.
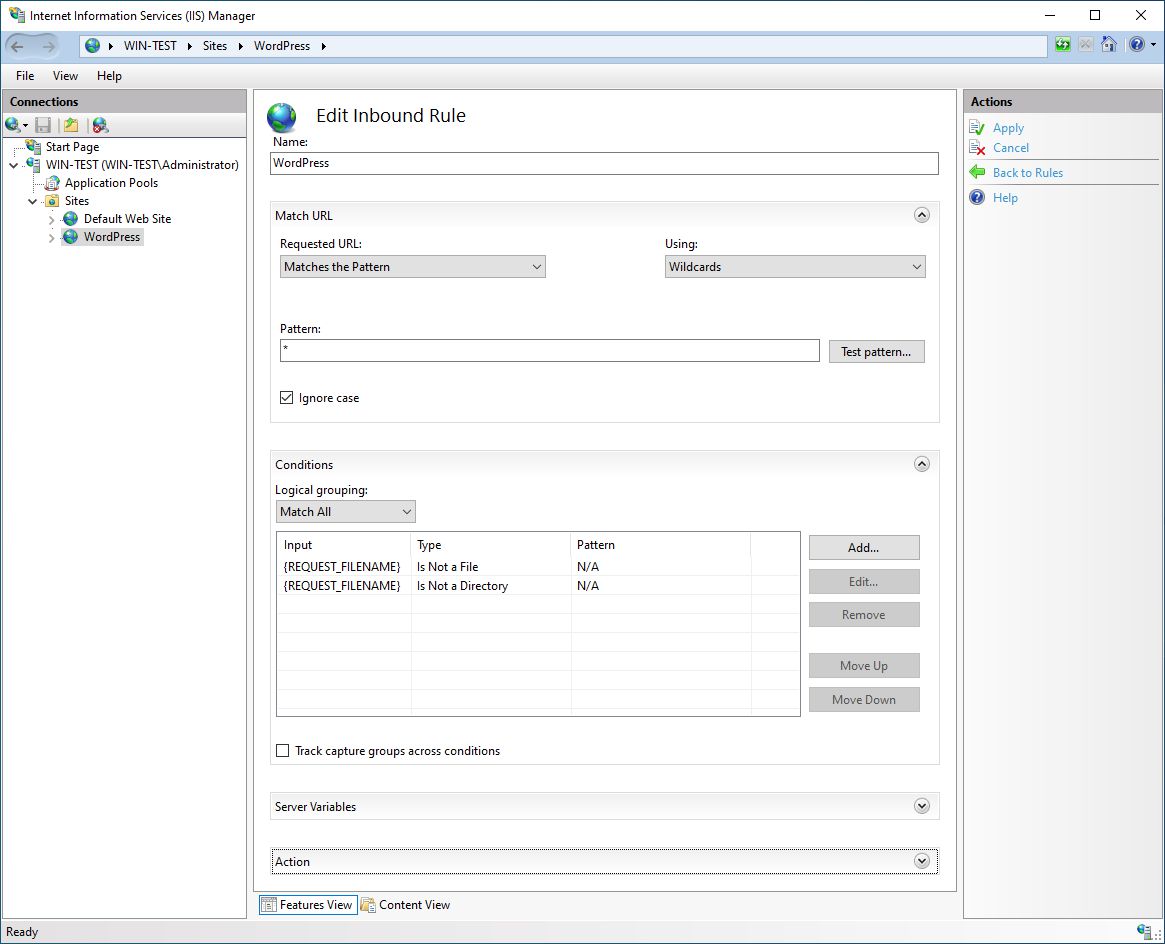
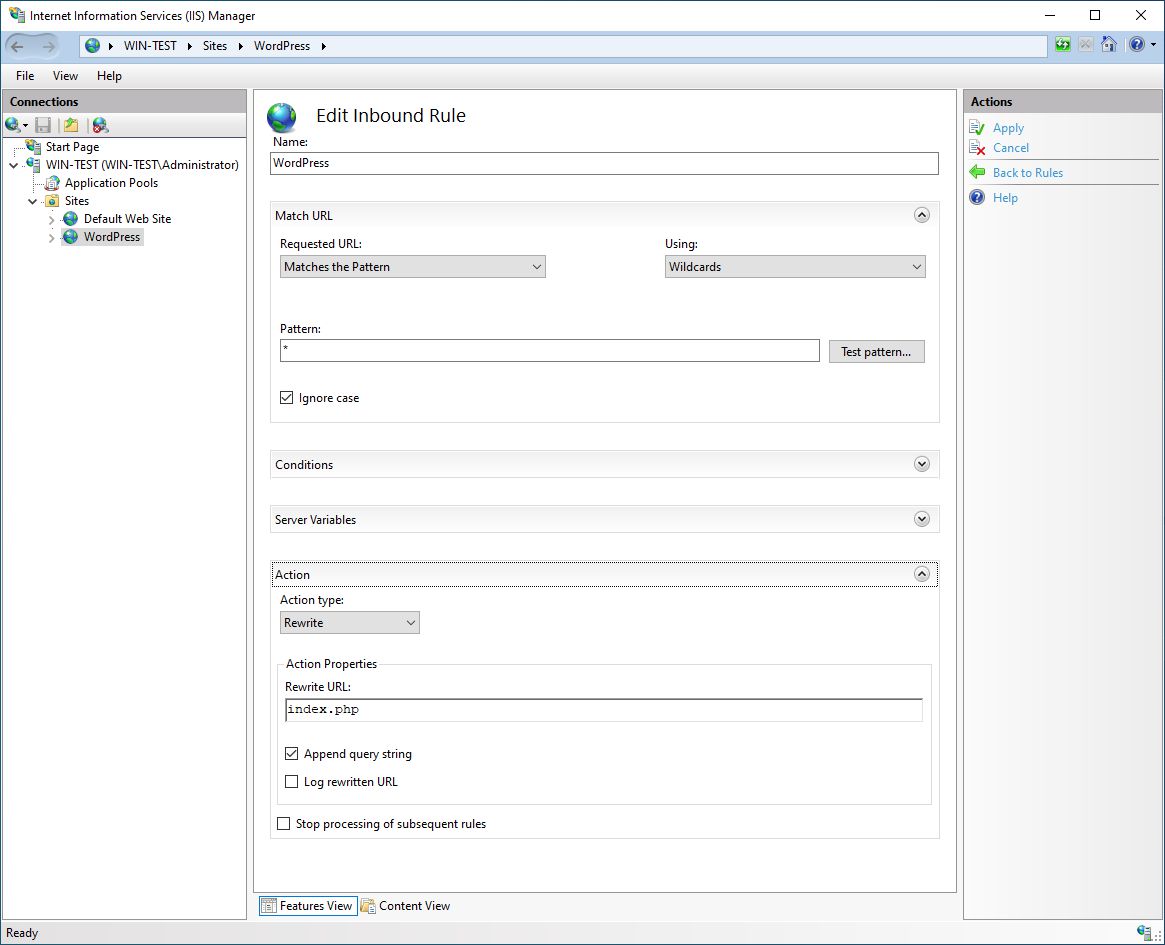
Now we need to open our WordPress Site in IIS Manager again and select URL Rewrite. Then we Add Rule… and select Blank rule. We have to edit Inbound Rule. We have to add Name (WordPress), change Using (Wildcards), add Pattern (*). Under Conditions, we add two conditions:
Conditions Input: {REQUEST_FILENAME}, Check if input string: Is Not a File
Conditions Input: {REQUEST_FILENAME}, Check if input string: Is Not a Directory
Under Action and Rewrite URL, we add index.php.
We would like to have a secure TLS (https) connection to access our Web Site, so we will need computer certificate for this. You can buy it or get it free by using Let’s Encrypt (one free option).
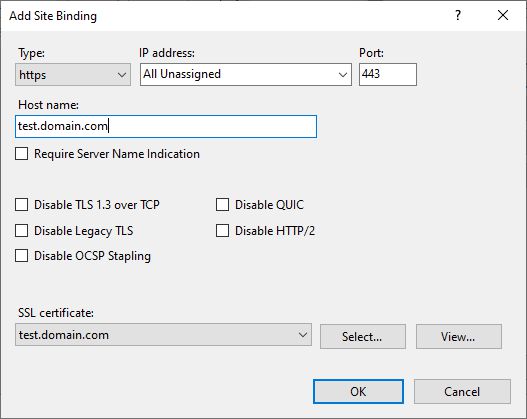
We have to add TLS (https) binding for WordPress Site. We select WordPress Site in IIS Manager and select Bindings… and then Add… button. In the Add Site Binding window, we select https type, Host name (test.domain.com) and finally select our SSL certificate.
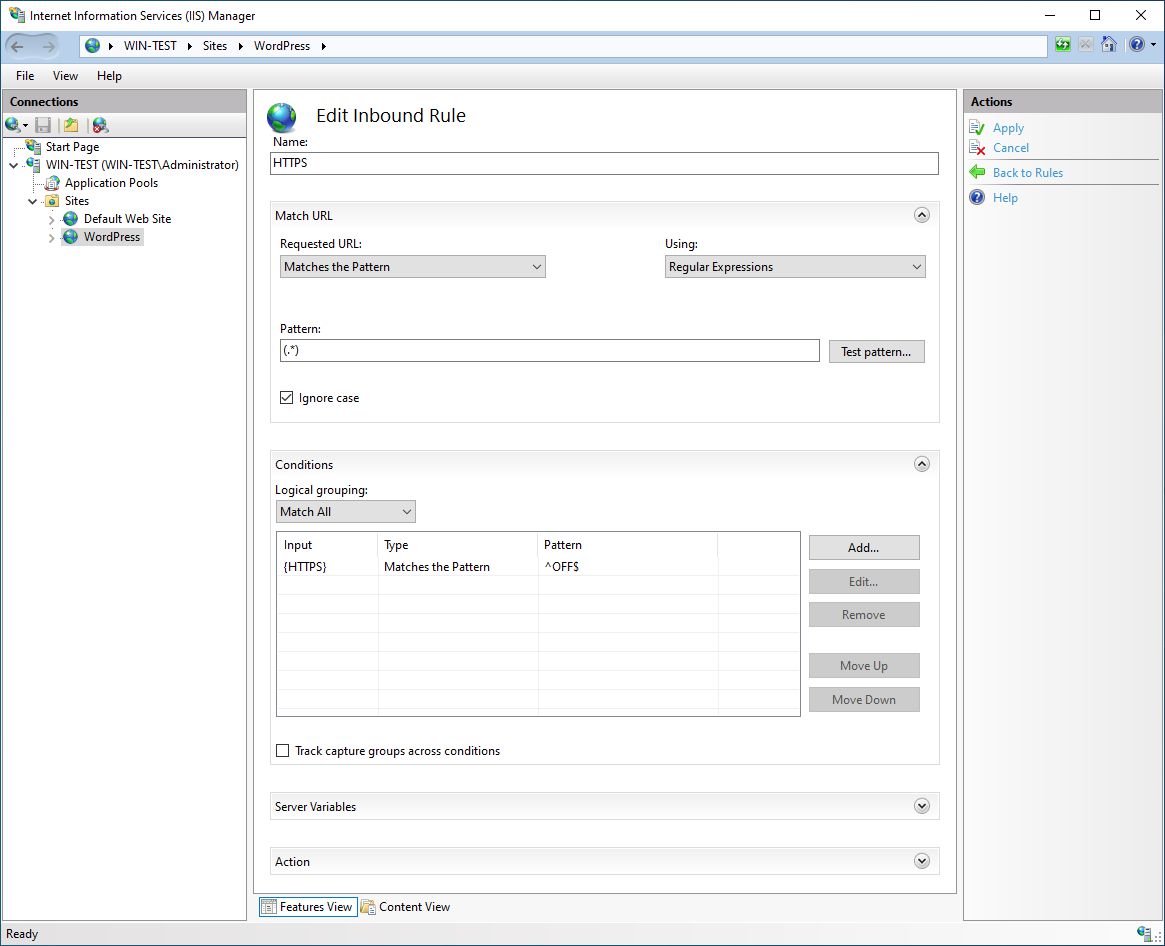
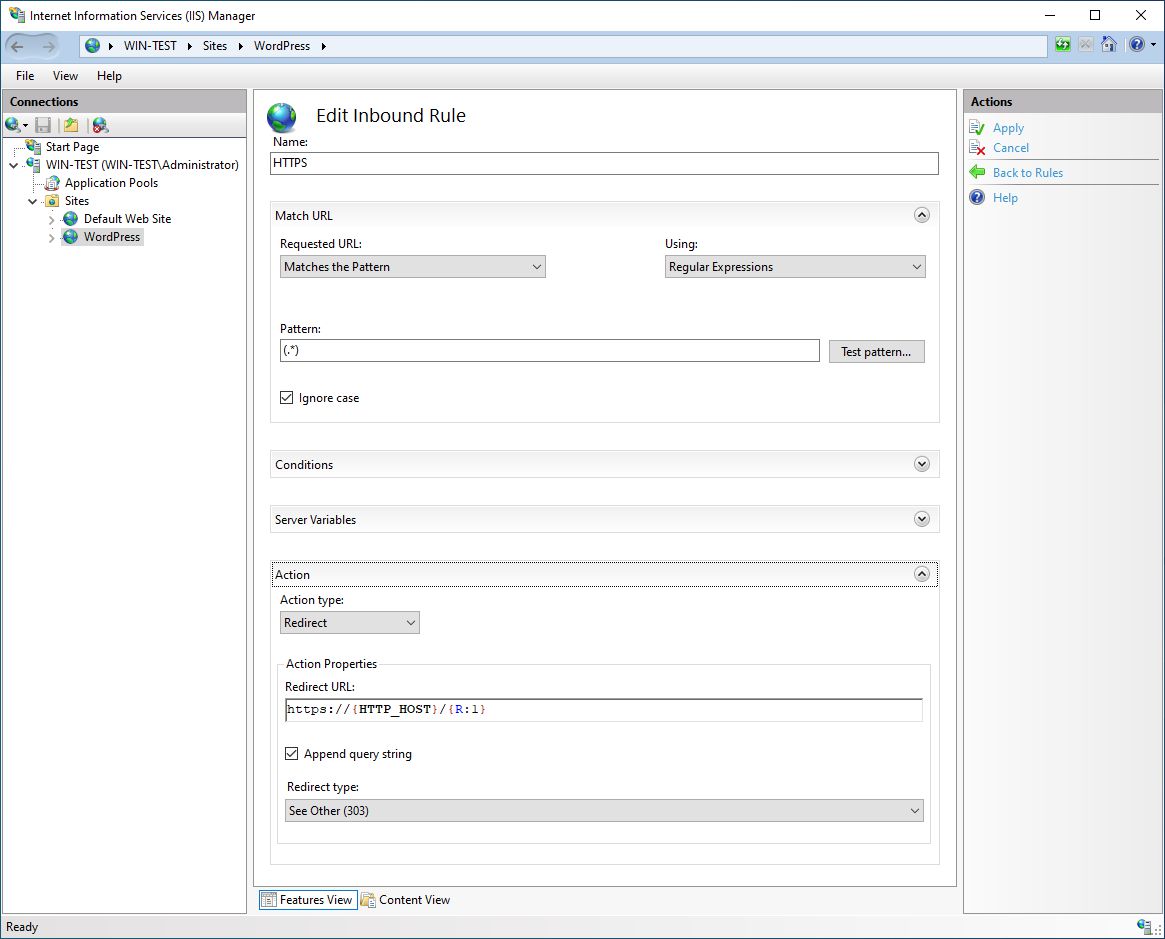
We want that all http requests to our site will be automatically redirected to https. For this purpose, we will create another URL Rewrite rule. So we select URL Rewrite, then we Add Rule… and select Blank rule. We have to edit Inbound Rule. We have to add Name (HTTPS), add Pattern (.*). Under Conditions, we add a condition:
Conditions Input: {HTTPS}, Check if input string: Matches the Pattern, Pattern: ^OFF$
Under Action, we select Redirect Action type with Redirect URL: https://{HTTP_HOST}/{R:1} and Redirect type: See Other (303).
Finally, we have to make a test, that IIS and PHP work fine together. For this we create a small phpinfo.php file in our WordPress folder (C:\inetpub\wordpress):

Now we need to open a browser and select WordPress site URL (http://test.domain.com/phpinfo.php). If everything works OK, site should be redirected to https and open a PHP info page.
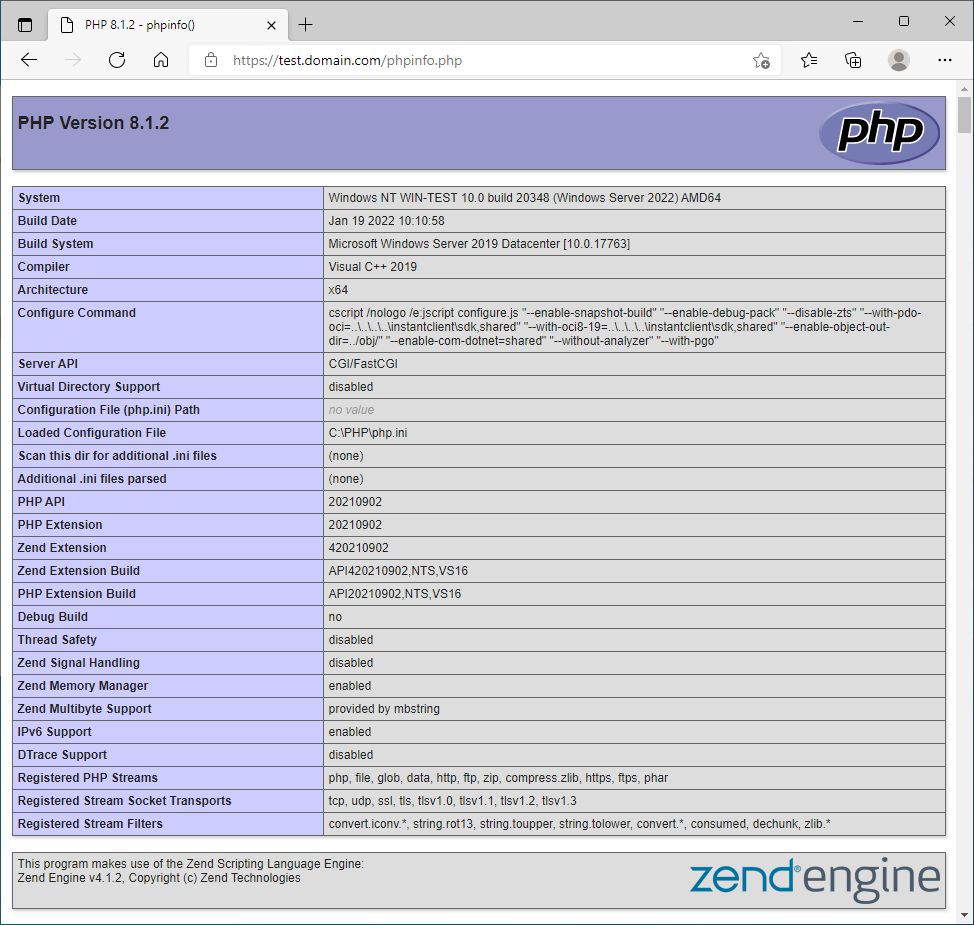
We see, that IIS, that use PHP as FastCGI is successfully configured.
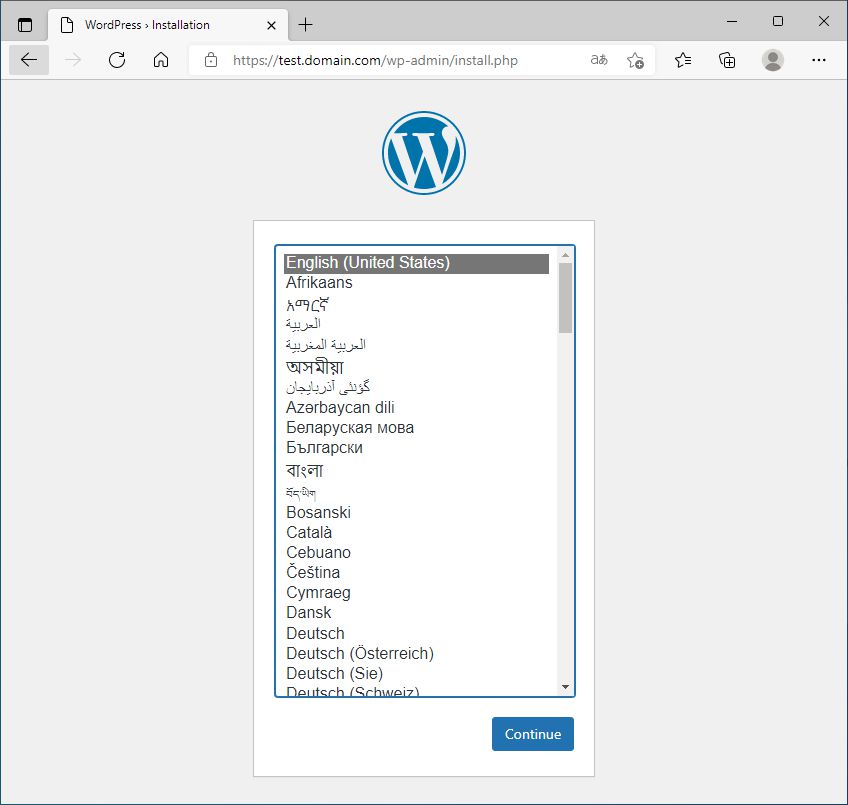
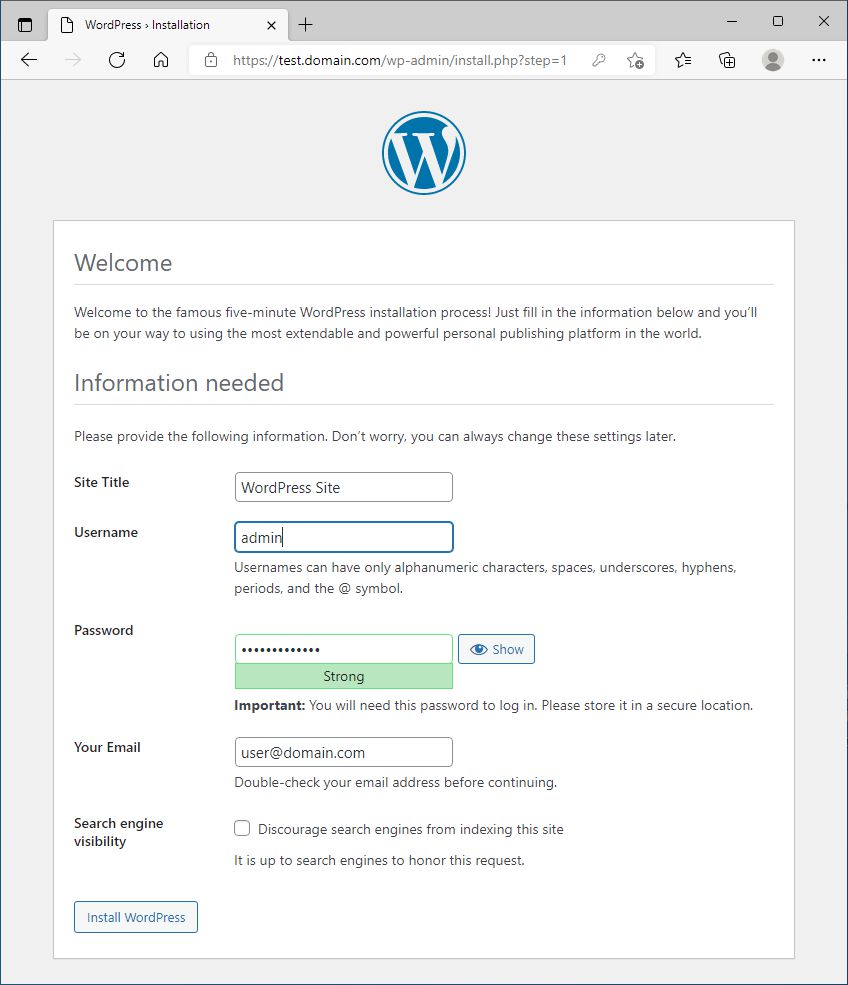
Now, we are finally ready to install and configure WordPress.


Recent Comments
{03E09F3B-DCE4-44FE-A9CF-82D050827E1C} Warning